HomeMinder® RVT App Instruction Guide
Table of Contents
- Thank You & Contact Information
- Package Contents
- Prior to Setup
- Initial Setup
- Setting and Adjusting the Motion and Temperature Alarms
- Setting the Alert Timestamp
- Setup SD Card Recording
- Setup SD Card Recording
- How Notifications Work
- Live View
- Snapshot
- Record
- Alarm
- How to Change the Name of Your HomeMinder
- How to Remove a HomeMinder from the App
- Registering Your HomeMinder
- Online HomeMinder Manual
- Setting up the Weather Station
- HomeMinder Warranty Information
Thank you for purchasing the HomeMinder® Remote Video and Monitoring System
We wrote these instructions so you can get the most out of your HomeMinder®, regardless of your technical knowledge.
If you would prefer to watch the setup video, please go to: www.MinderResearch.com/HM-Setup.
If you get stuck at any point, please let us know! We love talking to our customers! You can reach us at the number below:
(772) 463-6522
Monday-Friday, 9AM to 5PM Eastern
info@MinderResearch.com
www.MinderResearch.com
Minder Division of Valterra Products, LLC.
3000 SE Waaler Street
Stuart, FL 34997 USA
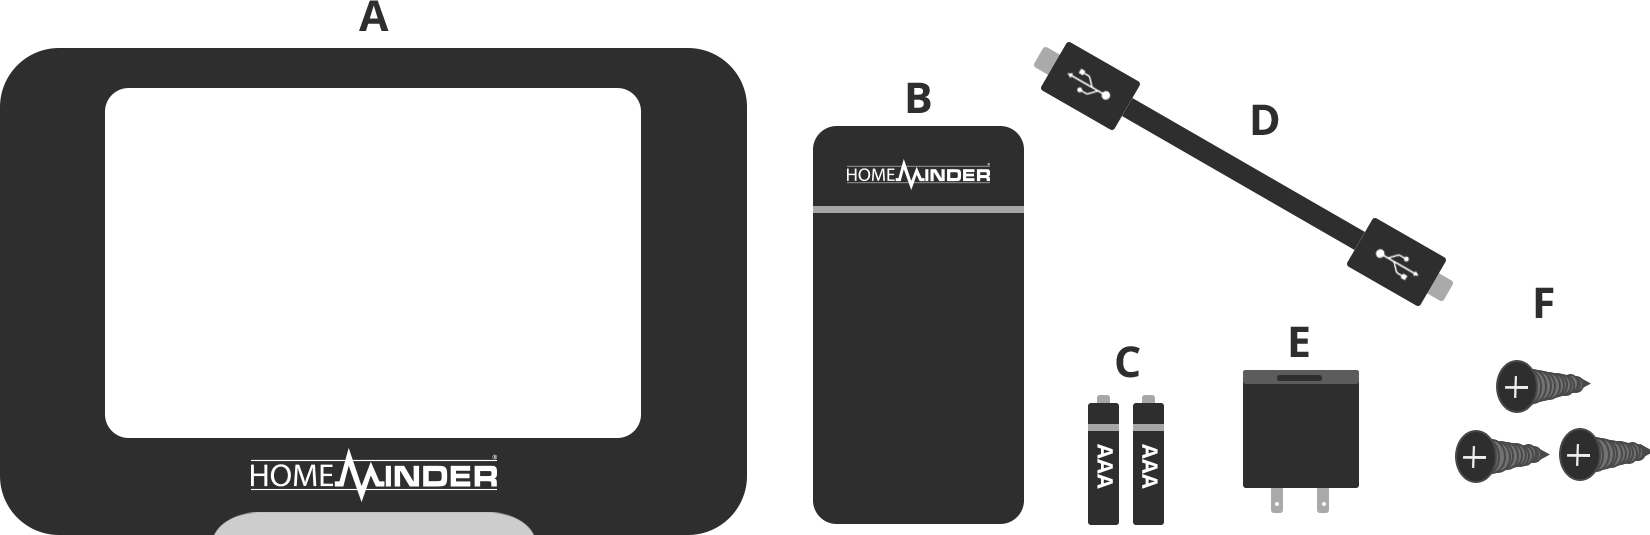
Package Contents
- 1 HomeMinder Monitor with Stand and Lithium-Ion Battery
- 1 Remote Sensor
- 2 "AAA" Batteries
- 1 Mini USB Charging Cable
- 1 Mini USB Charging Brick
- 3 Screws
Prior to Setup
- You must have access to Wi-Fi. This can be from a Wi-Fi router, a MiFi access point, a Hotspot, or any other Wi-Fi based access point that provides a reliable internet connection.
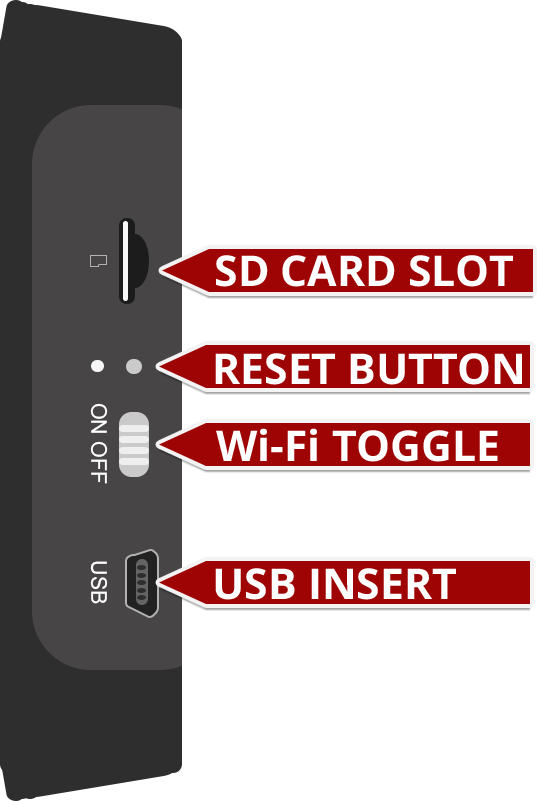
- On the right side of the HomeMinder® monitor, from the bottom up, you will see the Mini USB insert, the Wi-Fi toggle switch, the Wi-Fi reset button, and the Micro SD card slot.
- Make sure the Wi-Fi toggle switch is in the “ON” position. If at any point, you want to turn Wi-Fi off, move the Wi-Fi toggle switch to the “OFF” position.
- If you are using a Micro SD card (not included), insert a Micro SD card (up to 128GB) into the Micro SD card slot. Note, you can add a Micro SD card at any time.
- Remove the protective film from the front of the HomeMinder® monitor.
- Download the HomeMinder® App by Minder Research, Inc. from the Apple App Store or Google Play.
Initial Setup
- On the rear of the HomeMinder® Monitor, open the battery compartment and remove the battery tab. Once the battery tab is removed, the front display will turn on. If it does not turn on immediately, don’t worry it just needs a charge!
- Plug the Mini USB charging brick into an AC power source and plug the Mini USB charging cable into the charging brick. Next, plug the other end of the charging cable into the HomeMinder® Monitor. The monitors front display should now turn on.
- At this time, if you would like to use the remote sensor, place two "AAA" batteries into your remote sensor.
- After 1 minute, you will see the blue Wi-Fi light on the front bottom right of the display start to blink. When the light is blinking, the HomeMinder® monitor is ready to be setup.
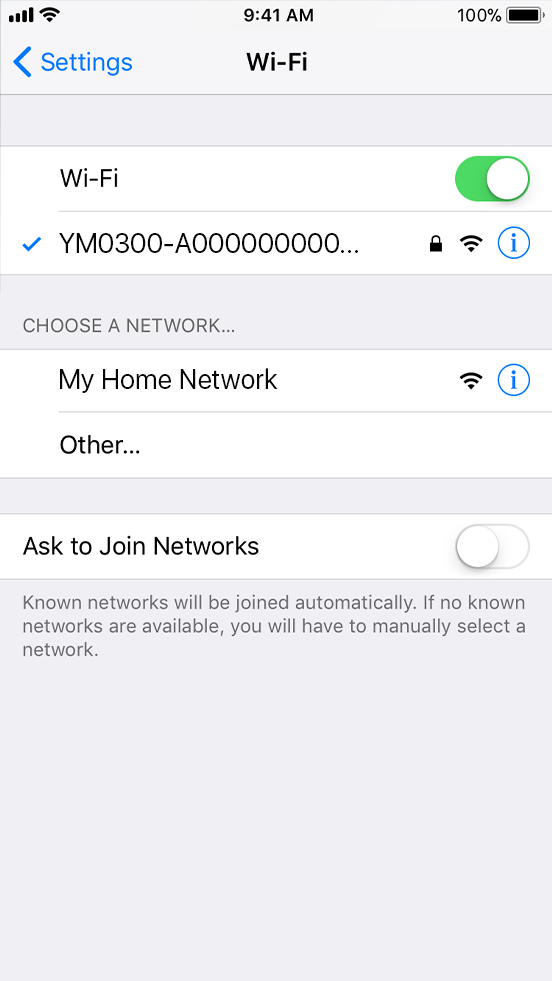
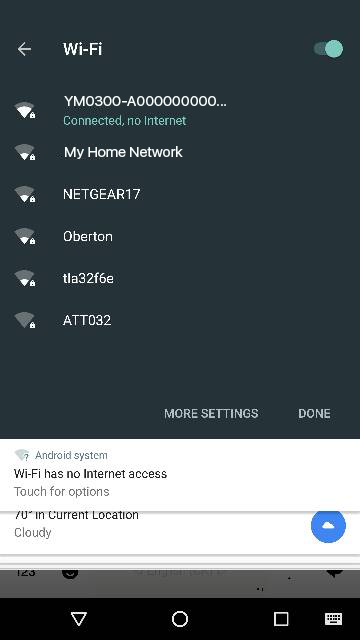
- On your iPhone, iPad or Android device, go into Settings and then Wi-Fi.
- Select the Wi-Fi Network that starts with “YM”, e.g. YM0300-A00000000000-123ABC. This is the HomeMinder®’s Wi-Fi Network.
- Once your smartphone or tablet has connected to the HomeMinder®’s Wi-Fi Network, open the HomeMinder® App.
- With the HomeMinder® App open, press the plus (+) button on the top right.
- Press the Search(LAN) button. You will now see your HomeMinder® Monitor on the top of the list. Touch on your HomeMinder® to automatically fill in the identification data (UID).
- Touch on the Name section and name your HomeMinder®. For example, if you are using several HomeMinder®’s you may want to call this HomeMinder® “RV” or “Home”.
- You do not need to enter the password as it is already set to the default password. The default password is 8888.
- Touch “OK” and you will be brought to the HomeMinder® home screen and your HomeMinder® monitor will be displayed at the top with the name that was set in the previous screen.
- We will now connect the HomeMinder® to your Wi-Fi network. Press the Settings button () to the right of your HomeMinder® on the app. This will bring up a menu with the following options: Modify Device, Delete Device, Reconnect, and Device Settings. Touch on Device Settings.
- In Device Settings, touch Wi-Fi Config. Select your current Wi-Fi network and enter the Wi-Fi password, then touch OK. The app will then reconfirm your input, if this looks correct, select
- The app will now inform you that your HomeMinder® is rebooting. Go back to your iPhone, iPad or Android device’s Settings and then Wi-Fi. You can now reconnect to your previous Wi-Fi or turn off Wi-Fi to use cellular data (if available).
- Go back to the HomeMinder® app and touch on your new camera. You will be prompted to change the default password. Select Change and enter a new password. Remember, to write down this password as you will need to reset the password if you forget it!
- Your HomeMinder® is now setup. Keep reading to learn more about how to take full advantage of your HomeMinder®!
Setting and Adjusting the Motion and Temperature Alarms
- Touch on the Settings icon on the HomeMinder® you would like to adjust, then select Device Settings.
- Inside Device Settings, touch on Alarm Config.
- At the top of Alarm Config, you can switch between High, Normal, or Low motion detection sensitivity, or you can disable it entirely. Select the level of motion detection sensitivity that works best for you. You can always select one and change it at any point in the future.
- Below Motion Detection Sensitivity is Temperature Alarm. Use the toggle to turn the temperature alarm On and Off.
- Below the Temperature Alarm toggle is where you can change the temperate from Celsius to Fahrenheit. Choose the unit of temperature you prefer.
- Next, you will see BELOW and ABOVE temperature selectors. You can either use the “–” and “+” buttons to lower or raise your desired alert parameters. You may also touch on either thermometer to enter in the temperature manually. To note, if you would like to be alerted when the temperature is above 80°F, move the ABOVE thermometer to 80°F. Alternatively, if you would like to be alerted when the temperature falls below 50°F, move the BELOW temperature to 50°F.
- Below the Temperature Alarm is Alarm Schedule. Using Alarm Schedule, you can edit the time of day that the alarm is active.
- Below Alarm Schedule is Alarm Interval. Alarm Interval is where you can set the frequency of push notifications you receive on your smartphone. You can choose a frequency between 30 to 240 seconds.
- The last option is to toggle Push Notifications. If you turn Push Notifications off, you will not receive motion or temperature alerts. However, if you are using the HomeMinder® app on multiple devices, those devices with Push Notifications on will still receive alert notifications.
- Once you have set your desired configuration, select OK at the bottom. If you wish to cancel your configuration, select Cancel.
Setting the Alert Timestamp
- Touch on the Settings icon on the HomeMinder® you would like to adjust, then select Device Settings.
- Inside Device Settings, touch on Time Setting.
- Here, you can either manually set the time or automatically sync the time with your device’s current time. If this is the first time setting up your device, we recommend using the “Sync App with Current Time” button to initially set the time.
- In Time Setting, you can also activate Daylight Savings Time, which will automatically adjust the clock in accordance with Daylight Savings Time. You can also toggle between 12 and 24-hour format.
What is Alert Timestamp?
The Alert Time is the time that will be shown next to an alert, each time an alert is displayed. The HomeMinder® keeps track of these alerts in the Alarm section (see page 7). For instance, if you set the time now and travel to a different time zone, and leave the HomeMinder® behind, the HomeMinder® will display the time that was last set to. Therefore, if your time was set to Eastern Time and you travel to the Pacific Time Zone, if you receive an alert at 9:00AM Pacific, the alert will state 12:00AM Eastern.
Setup SD Card Recording
With the Micro SD Card inserted into your HomeMinder®, following the following directions to setup automatic SD Card recording:
- Touch on the Settings icon on the HomeMinder® you would like to adjust, then select Device Settings.
- Inside Device Settings, touch on SD Card Record Config.
- On the top of SD Card Record Config, you will see the amount of space left in your SD Card. If this is a new SD card, the card should be fully empty. However, if you would like to format, or empty, the card, select Format on the bottom of the screen.
- The next option is Record. Here you can select Record Off, Records When Alarms, Records All Day or Timing Record. Record Off will turn off the recording to SD Card. Record When Alarms will only record when the HomeMinder® alarms. Records All Day will record 24/7. Timing Record will present you with a start and end time of when to record, each day.
- Below Record is Resolution. This is the resolution that the HomeMinder® Camera will record to. You can select 1080p for Full HD recordings, all the way down to 640p if the quality is not as important and you’d prefer to save SD Card space.
- Below Resolution is File Length(minute). This is the amount of time, in minutes, the HomeMinder® video file will be. The length of time can be set between 1 to 20 minutes. Note, once the set file time has passed, the HomeMinder® will immediately start recording a new file. We recommend setting this to 3 minutes, as some computers will have trouble processing large video files.
- Below File Length is the Record Sound Turning the toggle on will allow the HomeMinder® to also record sound with your video file.
- The last option in SD Card Record Config is Loop Recording. With this enabled, the HomeMinder® will automatically write over (replace) the earliest file, if the SD Card is full. For instance, if you start recording on Monday and the SD Card is full on Friday, the HomeMinder® will automatically start writing over videos from Monday to make room for the videos on Friday.
- Once you have selected your desired options, touch OK on the bottom of the screen. If you wish to cancel your selection, press Cancel.
Moving to a Different Location
If you are traveling with your HomeMinder® and need to connect it to a new Wi-Fi, press and hold the reset button on the right side of the monitor until the blue light on the front of the monitor disappears. Within 1 minute, the HomeMinder® will be reset. Use Initial Setup (page 3) to connect your HomeMinder® with a new Wi-Fi network.
How Notifications Work
The HomeMinder® system will alert you if it senses motion or if the temperature goes above or below the set temperatures (see Setting and Adjusting the Motion and Temperature Alarms on page 4). If your HomeMinder® senses motion and you tap on the notification, the app will bring you to the Alert section. Here you will see an image of what the HomeMinder® “sensed”. If your HomeMinder® detects a high or low temperature, it will send you a Temperature Alert. If you tap on a Temperature Alert notification, the app will bring you to the HomeMinder® home screen. Here you will be able to see the temperatures for all of your HomeMinder® systems. Note, this is where the names of your HomeMinder®s are important. For instance, if you named your HomeMinder® “Laundry Room” and get a Temperature Alert for “Laundry Room” you will know that your Laundry Room HomeMinder® is experiencing a high or low temperature.
Live View
If you touch on your HomeMinder®, you will open Live View. This will show you real-time video and temperature directly from your HomeMinder®. The display resolution will automatically adjust according to your internet speed. You can also make the following adjustments by tapping on the screen:
- Brightness: Allows you to increase or decrease the video brightness.
- Contrast: Allows you to increase or decrease the video contrast.
- Resolution (Displayed by 1080p, 720p, 640p or 480p): This allows you to manually adjust the real-time video resolution.
- Audio: Allows you to hear real-time audio from your HomeMinder®.
- Snapshot: Allows you to take a snapshot or image of what is currently being displayed on your HomeMinder®.
- Record: Allows you to record, to your smart device, what is currently being displayed on your HomeMinder®.
- Light: This will toggle the recording light on the front of your HomeMinder®.
- Exit: To get out of Live View, press the back button. Note, you must be in Portrait orientation to see the back button.
Snapshot
Snapshot will display all images that have been taken through Live View.
Record
Record will display all videos that have been recorded through Live View or on the HomeMinder®’s SD Card.
Alarm
Alarm is where you can see each alert, motion and temperature, that has been recorded by your HomeMinder®.
How to Change the Name of Your HomeMinder®
- Touch on the Settings icon on the HomeMinder® you would like to rename, then select Modify Device.
- From here, you can rename your HomeMinder®.
- Once you have renamed your HomeMinder®, touch OK. Note, do not adjust the UID or password.
How to Remove a HomeMinder® from APP
- Touch on the Settings icon on the HomeMinder® you would like to rename, then select Delete Device.
- Touch OK to confirm removal.
Registering Your HomeMinder®
- Touch on the Settings icon on the HomeMinder® you would like to rename, then select Device Settings.
- Next, touch Help and then Register.
- Fill out the registration form and click submit.
- You should receive a confirmation email from us within 30 minutes.
Online HomeMinder® Manual
Inside the HomeMinder® App is a constantly updated instruction manual. To access this instruction manual, please read the following directions or go to www.MinderResearch.com/HM-Setup:
- Touch on the Settings icon on the HomeMinder® you would like to rename, then select Device Settings.
- Next, touch Help and then Instruction Manual.
Setting up the Weather Station
Did you know the weather station portion of the HomeMinder® system is real? It is! To setup the HomeMinder® weather station, use the following directions:
- OUTDOOR TRANSMITTER - Insert 2 AAA batteries in the small black box. This is the remote transmitter which you may place up to 165 feet from the main HomeMinder®® base. You will see a Temp and Humidity appear in the lower right corner of the display.
- TIME/DATE - Press and hold “Time” button. Press “up” or “down” button to set the correct HOUR. Press “Time” button to confirm. Do the same for “Minutes”, then “Year, Month, Day and Language”. FYI, “EN” is English.
- ALARM TIME - press and hold “ALM” button. Press up or down to set the hour. Press ALM to confirm. Press up or down to set the desired minute. Press ALM to confirm. To activate or deactivate the Alarm press and release the ALM to bring up (OR NOT) a small “BELL” icon (above the seconds display).
- MAX/MIN – Press and release MAX/MIN button to show highest temp/humidity (in and out) since last reset. Press again the see lowest. Press and hold the MAX/MIN button to clear the memories (reset).
- HI/LO Remote Temp ALERT - Press and hold ALERT button. Raise or lower Temp to desired HIGH TEMP. Press and hold Alert Button (click twice) then set desired LOW TEMP. After setting, press and release the ALM button. Alert program is active when the up/down icon is visible.
Note: The Indoor temp and humidity shown in the upper right corner is what is transmitted via the HomeMinder® APP.
The lower left shows a simplified weather forecast for the upcoming 12 to 24 hours. Please note, this does not replace the weather channel!!
HomeMinder® Limited Warranty
This HomeMinder® Remote Video and Temperature Monitoring System is guaranteed against manufacturing defects for a period of one year from date of purchase. Should the unit not function as designed, Minder Division of Valterra Products, LLC. will repair or replace the section at no charge to the owner. Excluded are products that have been damaged through impact, water, fire, misuse or unauthorized service. This warranty is limited to the replacement of the product only and does not extend to any incremental cost incurred. In no case shall Minder’s liability exceed the purchase price. This warranty gives you specific legal rights which may vary from state to state or province to province. If you have a question or a problem, please contact us before returning the product. Many issues can be resolved over the phone.
If service is required, return with copy of bill of sale to:
Minder Division of Valterra Products, LLC.
3000 SE Waaler Street
Stuart, FL 34997
United States of America
(772) 463-6522
www.MinderResearch.com
info@MinderResearch.com
©COPYRIGHT – Minder Division of Valterra Products, LLC 2018